Tuesday, February 14, 2012

Chocolate Brownie Torte

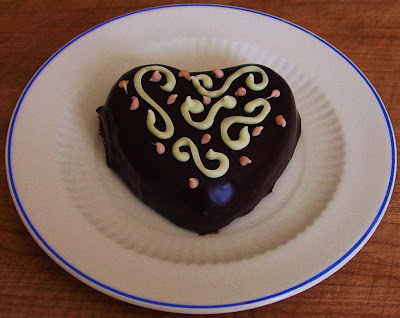
I know it's half-past Valentine thirty, but you need to make this recipe. I normally make this easy dessert in a 9" spring form pan, but I just couldn't pass up making these heart shaped hunks of chocolate goodness all adorned with cupid-esque cuteness in honor of Saint Valentine!!


This particular recipe was added to my repertoire some twenty years ago. It came with a group of recipe cards advertising a monthly recipe membership.  I made it once for a group of sewing friends and the rest is history.  The ingredients are pretty standard pantry staples and goes together in a matter of minutes.  The only lead time is allowing the torte to cool so that you can finish it with a fudgey glaze.

I'm giving you the original recipe. Over the years I've modified it to use organic corn syrup or organic agave (Wholesome Sweeteners brand) in place of conventional corn syrup. I've also found that whole wheat pastry flour (Wheat Montana brand) is a great substitution for all-purpose white flour. In my personal opinion, the end result is just as good, perhaps even better. As per usual, I use organic whenever possible. In this recipe I use organic butter, organic cane sugar and organic eggs.

Chocolate Brownie Torte

makes one 9" torte (10-12 servings)

1/2 cup corn syrup (Karo)
1/2 cup butter
1 cup semi-sweet chocolate chips
3 eggs
1/2 cup granulated sugar
1 tsp pure vanilla extract
pinch salt
1 cup all-purpose flour*
1 cup chopped walnuts

Preheat oven to 350 degrees. Grease and flour a 9" spring form pan. Melt corn syrup, butter and chocolate chips in a small saucepan over medium heat just until chocolate has melted.  Remove from heat and allow to cool slightly. Cream sugar, eggs and vanilla. Add melted chocolate mixture and stir just until mixed. Add salt, flour and nuts, mixing just until incorporated.  Bake 30-35 minutes or until done when tested in center. Let cool 10 minutes. Run a knife around the outside edge of spring form pan. Release spring form clamp and remove outer spring form ring.  Allow to completely cool.

*high altitude adjustments-add 1 tbsp flour

Glaze:
1 cup semi-sweet chocolate chips
4 tbsp butter
2 tbsp corn syrup (Karo)
1 tsp pure vanilla extract

Melt butter and corn syrup in a small saucepan over medium heat. Add chocolate chips and vanilla. Stir until melted. Allow to cool slightly, then pour over torte and spread along sides.

In honor of Valentine' Day, I made ganache rather than the standard glaze, so if you're feeling extra decadent and have the ingredients on hand, I'd say go for it. The ratio for ganache equal parts heavy cream and semi-sweet chocolate.

Chocolate Ganache:
8 oz heavy cream
8 oz semi sweet chocolate chips

Place chocolate chips in a medium bowl. Place heavy cream in a small saucepan and bring just to a simmer. Pour over chocolate chips. Allow to sit for a few minutes before stirring. Stir until melted. Allow to cool slightly, then pour over torte and spread along sides.


My pictures do not reflect it, but I also made strawberry coulis to go along with the torte and vanilla bean ice cream. ("cupid" adornment consists of melted white chocolate piped in a pastry bag)

Strawberry Coulis

makes approximately 2 cups

10-12 oz frozen organic strawberries
1/4 cup organic cane sugar
juice of half lemon

Add ingredients to a small saucepan. Bring to a simmer, then cook on low until sugar has dissolved. Use immersion blender to puree. Strain strawberry mixture using a fine mesh strainer. Allow to cool to room temperature, then refrigerate until ready to use. Can be made several days in advance.

The heart shaped pan is a Wilton product. I was lucky enough stumble upon this pan at a thrift store. If you know me, you'd understand the "lucky" part--I get weak in the knees for all things "♥"!  I won't go into detail, but I've included a picture depicting the heart shaped parchment liners I cut.  This step will make getting the baked goods out of the pan easy-peasy.  Just revert back to the paper cutting skills you acquired in kindergarten! Oh, and remember to grease the pan, insert parchment, then re-grease parchment followed by dusting with flour.


Thursday, February 9, 2012

DIY Granola


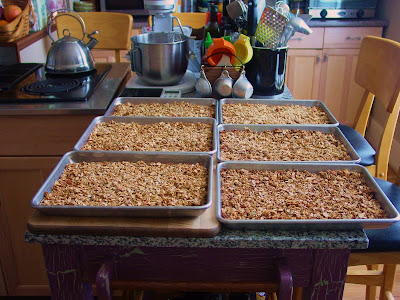
I've been procrastinating yet again. You see, I live in this cute, quaint one bedroom flat. And while my digs are pretty sweet, it has one draw-back. I only have a small counter top convection oven with three racks that hold a quarter size baking sheet. It requires almost double the time to make this granola because I can only bake half the recipe quantity at a time. Yes, I suppose I could cut the recipe in half and stop my whining, but I have family genetics that say "if you're gonna do it, well then you might as well make enough to feed a small army!" The batch makes alot. I can eat granola and yogurt well over a month before having to make it again. And now that I've made it, I'm happy. Happy because my breakfast routine will consistently be more healthy than it has been in, well, awhile.

ps. This recipe goes together quick. It can be made start to finish in 30 or so minutes.

This recipe has a history, as does most recipes I've collected over the years. It  given to me by a guest while cooking at the Lazy E-L Ranch. I was told the recipe came from Martha Stewart, however I have not taken the time to research this statement.  The only modifications I've made to the recipe is using organic ingredients wherever possible and using oat bran rather that wheat germ/bran so that it is gluten free.

For those folks living in our small mountain town, most, if not all recipe ingredients can be purchased from the bulk grocery section at Cafe Regis.

Crunchy Nutty Granola

makes approximately 14 cups or 42 1/3 cup servings

1 cup chopped dates
1 cup water
1/4 cup organic canola oil
1/4 cup frozen apple juice concentrate

8 cups organic rolled oats
1 cup organic oat bran
2 cups unsweetened shredded coconut (referred to as desiccated coconut)
1/2 cup raw sunflower seeds
1/2 cup chopped walnuts
1/2 cup raw slivered almonds

1 cup dried fruit, such as raisins, craisins, cherries, etc.

Preheat oven to 350 degrees. Place first four ingredients in a small sauce pan over medium heat. Bring to a simmer and cook until mixture resembles a paste.

Meanwhile, in a large bowl, mix oats, oat bran, coconut, seeds & nuts. Divide mixture amongst sheet pans. For you "normal" size oven folks this would be 3 half sheet pans. Place in oven and toast mixture for about 15 minutes, rotating half way through cooking time.

Remove from oven and transfer back to large mixing bowl. Pour date paste mixture over top of oat mixture. Stir well so that date paste is well incorporated. Divide mixture amongst sheet pans for a second time. Bake an additional 10 minutes or until a nice golden brown, rotating half way through cooking time.

Remove from oven and allow granola to cool in sheet pans. The granola will become crispy as it cools.


Transfer back into large mixing bowl. This is the point you would add the dried fruit. Over the years I have started omitting this ingredient as like to eat my granola with berries. I purchase the frozen variety at Costco & thaw as I need them.

Transfer to storage container. My container of choice is a one gallon glass jar I obtained from my days working in the restaurant business. I have stored a batch this size well over a month and have not noticed a decline in freshness, so in my opinion, it stores well.


The recipe as written has approximately 150 calories for each 1/3 cup serving. For this particular batch, I added an extra 1/2 cup each of sliced almonds and pepitas because I had them on hand and wanted to utilize them. In the past I've added raw whole almonds, cashews and pecans. Feel free to add your nut of choice with the understanding the calorie count will change.

Sunday, February 5, 2012

Nutella topped Pumpkin-Chocolate Brownie Bites

Fellow blogger Cafe Fernando and My Baking Addiction announced that today was World Nutella day. Go figure, could it be that I was in sync with "something"...nah!!

So yes, I made these for the Superbowl Party today, but I'm not going to yammer on (like I normally do) or post lots of pictures...I still need to get the chorizo queso made!!


For all you low-landers, head on over to Yum Sugar for the recipe. I omitted topping them with walnuts and chocolate chips. I went straight for the jar of Nutella (slightly warmed in the microwave)and frosted the brownie bites with Nutella goodness once they were cooled. I chose this easy approach, but if you've got the time, I suggest you head on over to My Kitchen Addiction and use the nutella ganache recipe. The ganache will set up nicely and not be as finger-licking messy as I presume these to be!

Mountain town folks at 5,500 ft should use these high altitude adjustments:

add 2 tbsp flour
add an additional egg
decrease sugar by 2 tbsp

Enjoy the Superbowl...go blue & red!! ;-)

DIY Mexican Chorizo

It's Superbowl Sunday and I planned to make a cheesy-chorizo queso dip, only to find that our little grocery store was o-u-t of chorizo. "FINE", I said...I'll make my own!!

When you have all the ingredients, making fresh chorizo is not that daunting of a task.  I know this, because I developed a recipe for the Fishtail General Store while working there for winter employment between seasonal summer work cooking at the 4K ranch.  Ha, daunting you say...do you think I could find that recipe? "FINE", I said...I'll make my own recipe!

I know, in my heart of hearts, the end result is different than my previous work creating this recipe, but that's OK, because it's still tasty.  Use the best quality ingredients you can find. I normally use ground pork from Silvertip Pork Producers, but again, the grocery store was out.


Mexican Chorizo

makes 1 pound

1 lb ground pork
2 cloves garlic
1 1/2-2 tsp kosher salt
1 dried cayenne chili pepper
1 tbsp ground cayenne pepper
1 tbsp ground chili powder
1 tbsp ground Hungarian hot paprika
1 tbsp ground paprika
1 tbsp leaf oregano
1 tbsp ground cumin
1/2 tsp ground black pepper
1/8 tsp ground cloves
1 tsp organic pure cane sugar
2 tbsp cider vinegar
1 1/2 tbsp water

pair latex gloves for mixing

Mince garlic to this stage.


Sprinkle kosher salt over top of garlic...like this..


Then, using the back of a chef knife, create a paste by working kosher salt into garlic. The garlic paste should look something like this...


Next, place the dried chili pepper into a coffee grinder that is dedicated for grinding spices. I used chiles that I had harvested from Wholesome Foods Organic Ranch& Produce last fall. Grind until the pepper resembles crushed red chili flakes similar to what is used to sprinkle on pizza.


Add ground pork, garlic paste, crushed red chili and remaining ingredients into a medium mixing bowl.

 
Using gloves, mix until well incorporated. I didn't have the option this time, but the chorizo is best if it is allowed to rest 24 hours in the refrigerator.


At this point, use the chorizo in your favorite recipe, or package contents and freeze for use at a later time.