Thursday, April 12, 2012

French Scrambled Eggs

April showers have visited our small mountain town. A dreary, gray day made perfect by spending an hour in the kitchen! I made these muffins to go along with my french scrambled eggs! And yes, bacon!!


French Scrambled Eggs

serves 1 (multiply accordingly)

2 eggs
2 tbsp milk or cream (I compromised and used half & half)
pinch sea salt
few grinds fresh cracked black pepper
2 tsp butter
pinch dried dill weed*
1 scallion, chopped
~1 oz cream cheese, cut into small bits
chiffonade of spinach (3-6 leaves), optional 

Whisk eggs, half & half, sea salt and fresh cracked black pepper in a small bowl. Melt butter in a non-stick saute pan over medium heat. Add egg mixture to pan. Continuously stir egg mixture using using a heat proof spatula. Eggs are done when they are set, but still creamy. Remove pan from heat, add dill weed and the cut up bits of cream cheese. Residual heat from eggs will melt the cream cheese and spinach.

*A combination of chopped fresh herbs such as chives, chervil, marjoram, parsley & tarragon (fines herbs in francey-pants lingo!) are equally as delicious!

Lemon-Blueberry Muffins


The recipe for these muffins are a riff on a previous recipe I posted for Cranberry-Orange Muffins. Besides the obvious substitution of lemon and blueberries for the orange and cranberries, I adjusted the fat called for in the recipe by using a combination of organic butter, organic canola oil and ground golden flax seed.  The texture of the baked product was not comprimised...just as moist and tender as before. On my next attempt, I think I will completely omit the butter and use equal amounts of canola oil and ground flax seed. My reasoning for mixing up the fat is in an attempt to reduce my saturated fat intake since saturated fat creates an inflamation response in the body while plant based fats (olive, canola, etc) are considered unsaturated, thus creating an anti-inflamatory response in the body.  Play with this sometime...cut the saturated fats out of your daily diet for a month or so, then introduce back in if only for a day. I did and immediately felt a difference with my joints, particularly in my hands.

3 tablespoons of ground flax can be substituted for 1 tbsp oil.

Ground Flax seed can be used as an egg replacer as well.  For each egg to be replaced, blend in a blender/food processor 1 tablespoon flax seed with 3 tablespoons water until the mixture is thick and creamy. If this seems a bit messy (I thought so), grind your flax seed in a dedicated spice grinder (aka coffee grinder) then add to water that has already been measured and placed in a small bowl. Mix well.
Lemon-Blueberry Muffins

makes 12 muffins

2 cups whole wheat pastry flour (I used Prairie Gold Wheat Montana brand)
2 tsp baking powder
1/2 tsp baking soda
1/2 tsp kosher salt
4 tbsp organic butter, melted & cooled

3 tbsp organic canola oil
3 tbsp ground golden flax
2/3 cup organic cane sugar
2 large eggs

1 tsp vanilla
1 lemon, zested* & juiced (reserve juice--use for high alt. adjustments)
1 cup buttermilk (our store does not carry organic)

6 oz clam shell fresh bluewberries (approx 1 1/2 cups)
1 tbsp demerara sugar

Preheat oven to 375 degrees. Grease or line muffin tins with paper liners.
Add first four ingredients in a large mixing bowl. Whisk to combine.
Whisk remaining ingredients, minus 1 tbsp demerara sugar and blueberries, in a medium mixing bowl.
Using wooden spoon, or spatula, add wet ingredients to dry ingredients; mixing just until combined. Fold in blueberries.
Fill muffin cups almost full. Sprinkle tops of muffins with demerara sugar.

Bake 20-25 minutes or until done when tested with a toothpick in the center.

High Altitude Adjustments:
 •baking powder-reduce by 1/4 tsp
 •sugar-reduce by 1 tbsp
 •liquid-add 1/4 cup fresh squeezed lemon juice
 •oven temperature-increase 25 degrees
 •decrease baking time approx 5 minutes


Wednesday, April 4, 2012

Huevos Rancheros with Frijoles Borrachos

The fact that I do not have to start thinking about my job until mid-day provides me the luxury of enjoying a morning meal, all at the leisurely pace of what feels like a quiet Sunday morning. This doesn't happen every morning, but when it does, I certainly feel like I'm making up for all those years of having to be out of the house for my morning commute long before the chickens were up! Only to be relegated to eating breakfast at my desk. The only thing I miss from those days are some great people I met along the way.

So on with the post of what I savored this morning....Huevos Rancheros...complete with a latte and mellow music playing. Would it be over-the-top to mention the gas fireplace flickering in the background? The morning would be perfect if kitchen fairies were washing the dishes!


I really don't have a recipe for the Huevos. I simply layered 2 sprouted corn tortillas with re fried beans, a few over-easy eggs speckled with fresh cracked pepper, my homemade salsa verde and a few drizzles of Sriracha because I like it hot! I happend to have an avocado so I added a few slices for garnish. You can serve them with black beans, chorizo, fresh cilantro, salsa, sour cream, scrambled eggs, etc....whatever you like and have on hand.

I am going to provide the recipe for the beans I made. This recipe makes quite a bit, so unless you're feeding a "thrashing crew" I'd suggest freezing the finished product into smaller portions for use at a later date.

Frijoles Borrachos

4 jalapeno chiles, stems and seeds removed, cut in half lengthwise
2 c pinto beans, cleaned and rinsed (1 pound bag)
12 oz beer (I go all out and use PBR)
1 onion, rough chopped
6 c water
kosher salt & fresh cracked black pepper to taste

Place all ingredients in a large stockpot (6-8qt) and soak overnight. The next morning, bring the mixture to a boil, reduce heat and simmer until the beans are done. Add more water if necessary.  Everyone is different here, but I prefer the beans tender, but not cooked to mush. Mash the beans using the tool of your choice. I like to use my stick (immersion) blender & puree only a portion of the beans. You can use a hand held potato masher, a food processor, blender, etc. Season to taste with kosher salt & black pepper.

At this point, the beans are ready to be re-fried. Again this is a personal preference. I believe they're perfect now, but some folks like to fry the beans in oil, hence re-fried...could be vegetable, manteca (lard), even better yet, bacon grease. The smokiness from bacon grease imparts a sublime flavor profile...you choose.

This recipe originates from a book entitled The Whole Chile Pepper Book by Dave Dewitt and Nancy Gerlach. The famed editors of Chile Pepper Magazine. I own a few books by Dave...great inspiration for any chile-head!

Thursday, March 22, 2012

Mj to Mt 1yr birthday and Winter Squash Quiche with Spinach & Proscuitto

Mason Jars to Muffin Tins blog turns one year old today! This blog was borne from a desire to share my love of food along with "anything" you can put in a jar! Thanks go out to everyone who has taken the time to read it this past year!
My experience is limited to using Goggles blog tools, but so far I'm pretty happy! They have built in statistics functionality to show the blogger interesting reader data.  Listed below are some of my blogs highlights over the past year: 
 
Total Page view History: 2,275 (6 views per day average)

Page views by country: (in order from high to low)
  1. US
  2. Canada
  3. UK
  4. Germany
  5. Australia
  6. Russia
  7. Netherlands
  8. France
  9. South Korea
  10. Malaysia
Top 3 referring sites:
  1. google.com
  2. facebook.com
  3. google.ca (Canada)
Top 3 Posts viewed:
  1. DIY Cold Brew Coffee 256 views
  2. Helme's Railroad Mills Amber Jar 130 views
  3. Strawberry Rhubarb Jam with Vanilla Bean & Bergamot 73 views
In honor of Mason Jar's 1yr birthday, I have "gifted" the blog and it's readers with added functionality...Printing capabilities and a Pinit button for Pinterest. I'm more than a little jazzed about this, not gonna lie!! This would not have been possible without the great web design services from Devan over at Desani Designs. Trust me when I say "this would not have been possible"...I consider myself pretty computer savvy, and yes, I attempted to do this myself. Only to come to the realization that programming is not my forte! With that said, check out Devan's site if you need any web development..fast, efficient & friendly! So, check it out folks...at the bottom of every post are "printer friendly" and "Pinit" buttons..wahoo!!

I'd also like to give a special shout out to Jenessa over at And That's Beautiful To Me. She gave me gentle nudging along with the final push to get this baby off the ground!
 
Here is a recipe for a great breakfast treat. I made this to take to our last day of a ten week class held at the Red Lodge Clay Center. This particular class was taught by artist in residence Andrew Gilliatt. His work has a finesse that is jaw-dropping to say the least..."♥" it Andrew!

Winter Squash Quiche with Spinach & Prosciutto

makes one 9" deep dish quiche 6-8 servings (or 4 if you're really hungry!)

Inspiration for my recipe came from a recipe for Savory Pumpkin Quiche over at babble.com. I didn't get a picture taken of the full size version, but here is a picture of the individual quiches I made...enjoy!


1 pie crust of your choice, blind baked in a deep 9" pie pan
2 c heavy cream (or any combination of cream, half & half or whole milk)
4 eggs
2 c oven roasted butternut squash*
1/2 cup julienned prosciutto
1/2 cup chopped spinach
1/2 red onion, small dice (any onion will do...red is what I had on hand)
1 clove garlic, minced
1 tbsp chopped parsley
kosher salt & fresh cracked pepper
1 1/2-2 cups shredded Gruyere cheese

*Toss 1" cubes of peeled and seeded squash lightly with olive oil, kosher salt and black pepper. Place on a parchment lined baking sheet and roast in a 400 degree oven for 20-30 minutes or until tender.

Preheat oven to 350 degrees. Follow the link for blind baking your crust. Good Housekeeping provides perfection instruction!  In a medium bowl, whisk heavy cream eggs, garlic, parsley and a pinch of kosher salt & fresh cracked pepper. Spread half the shredded cheese over the pie crust. Repeat process with squash, prosciutto, spinach and onion followed by remaining cheese. Pour egg mixture over the top. Bake 35-40 minutes or until custard is set. Let cool 5-10 minutes before slicing.

Tuesday, February 14, 2012

Chocolate Brownie Torte

I know it's half-past Valentine thirty, but you need to make this recipe. I normally make this easy dessert in a 9" spring form pan, but I just couldn't pass up making these heart shaped hunks of chocolate goodness all adorned with cupid-esque cuteness in honor of Saint Valentine!!


This particular recipe was added to my repertoire some twenty years ago. It came with a group of recipe cards advertising a monthly recipe membership.  I made it once for a group of sewing friends and the rest is history.  The ingredients are pretty standard pantry staples and goes together in a matter of minutes.  The only lead time is allowing the torte to cool so that you can finish it with a fudgey glaze.

I'm giving you the original recipe. Over the years I've modified it to use organic corn syrup or organic agave (Wholesome Sweeteners brand) in place of conventional corn syrup. I've also found that whole wheat pastry flour (Wheat Montana brand) is a great substitution for all-purpose white flour. In my personal opinion, the end result is just as good, perhaps even better. As per usual, I use organic whenever possible. In this recipe I use organic butter, organic cane sugar and organic eggs.

Chocolate Brownie Torte

makes one 9" torte (10-12 servings)

1/2 cup corn syrup (Karo)
1/2 cup butter
1 cup semi-sweet chocolate chips
3 eggs
1/2 cup granulated sugar
1 tsp pure vanilla extract
pinch salt
1 cup all-purpose flour*
1 cup chopped walnuts

Preheat oven to 350 degrees. Grease and flour a 9" spring form pan. Melt corn syrup, butter and chocolate chips in a small saucepan over medium heat just until chocolate has melted.  Remove from heat and allow to cool slightly. Cream sugar, eggs and vanilla. Add melted chocolate mixture and stir just until mixed. Add salt, flour and nuts, mixing just until incorporated.  Bake 30-35 minutes or until done when tested in center. Let cool 10 minutes. Run a knife around the outside edge of spring form pan. Release spring form clamp and remove outer spring form ring.  Allow to completely cool.

*high altitude adjustments-add 1 tbsp flour

Glaze:
1 cup semi-sweet chocolate chips
4 tbsp butter
2 tbsp corn syrup (Karo)
1 tsp pure vanilla extract

Melt butter and corn syrup in a small saucepan over medium heat. Add chocolate chips and vanilla. Stir until melted. Allow to cool slightly, then pour over torte and spread along sides.

In honor of Valentine' Day, I made ganache rather than the standard glaze, so if you're feeling extra decadent and have the ingredients on hand, I'd say go for it. The ratio for ganache equal parts heavy cream and semi-sweet chocolate.

Chocolate Ganache:
8 oz heavy cream
8 oz semi sweet chocolate chips

Place chocolate chips in a medium bowl. Place heavy cream in a small saucepan and bring just to a simmer. Pour over chocolate chips. Allow to sit for a few minutes before stirring. Stir until melted. Allow to cool slightly, then pour over torte and spread along sides.


My pictures do not reflect it, but I also made strawberry coulis to go along with the torte and vanilla bean ice cream. ("cupid" adornment consists of melted white chocolate piped in a pastry bag)

Strawberry Coulis

makes approximately 2 cups

10-12 oz frozen organic strawberries
1/4 cup organic cane sugar
juice of half lemon

Add ingredients to a small saucepan. Bring to a simmer, then cook on low until sugar has dissolved. Use immersion blender to puree. Strain strawberry mixture using a fine mesh strainer. Allow to cool to room temperature, then refrigerate until ready to use. Can be made several days in advance.

The heart shaped pan is a Wilton product. I was lucky enough stumble upon this pan at a thrift store. If you know me, you'd understand the "lucky" part--I get weak in the knees for all things "♥"!  I won't go into detail, but I've included a picture depicting the heart shaped parchment liners I cut.  This step will make getting the baked goods out of the pan easy-peasy.  Just revert back to the paper cutting skills you acquired in kindergarten! Oh, and remember to grease the pan, insert parchment, then re-grease parchment followed by dusting with flour.


Thursday, February 9, 2012

DIY Granola


I've been procrastinating yet again. You see, I live in this cute, quaint one bedroom flat. And while my digs are pretty sweet, it has one draw-back. I only have a small counter top convection oven with three racks that hold a quarter size baking sheet. It requires almost double the time to make this granola because I can only bake half the recipe quantity at a time. Yes, I suppose I could cut the recipe in half and stop my whining, but I have family genetics that say "if you're gonna do it, well then you might as well make enough to feed a small army!" The batch makes alot. I can eat granola and yogurt well over a month before having to make it again. And now that I've made it, I'm happy. Happy because my breakfast routine will consistently be more healthy than it has been in, well, awhile.

ps. This recipe goes together quick. It can be made start to finish in 30 or so minutes.

This recipe has a history, as does most recipes I've collected over the years. It  given to me by a guest while cooking at the Lazy E-L Ranch. I was told the recipe came from Martha Stewart, however I have not taken the time to research this statement.  The only modifications I've made to the recipe is using organic ingredients wherever possible and using oat bran rather that wheat germ/bran so that it is gluten free.

For those folks living in our small mountain town, most, if not all recipe ingredients can be purchased from the bulk grocery section at Cafe Regis.

Crunchy Nutty Granola

makes approximately 14 cups or 42 1/3 cup servings

1 cup chopped dates
1 cup water
1/4 cup organic canola oil
1/4 cup frozen apple juice concentrate

8 cups organic rolled oats
1 cup organic oat bran
2 cups unsweetened shredded coconut (referred to as desiccated coconut)
1/2 cup raw sunflower seeds
1/2 cup chopped walnuts
1/2 cup raw slivered almonds

1 cup dried fruit, such as raisins, craisins, cherries, etc.

Preheat oven to 350 degrees. Place first four ingredients in a small sauce pan over medium heat. Bring to a simmer and cook until mixture resembles a paste.

Meanwhile, in a large bowl, mix oats, oat bran, coconut, seeds & nuts. Divide mixture amongst sheet pans. For you "normal" size oven folks this would be 3 half sheet pans. Place in oven and toast mixture for about 15 minutes, rotating half way through cooking time.

Remove from oven and transfer back to large mixing bowl. Pour date paste mixture over top of oat mixture. Stir well so that date paste is well incorporated. Divide mixture amongst sheet pans for a second time. Bake an additional 10 minutes or until a nice golden brown, rotating half way through cooking time.

Remove from oven and allow granola to cool in sheet pans. The granola will become crispy as it cools.


Transfer back into large mixing bowl. This is the point you would add the dried fruit. Over the years I have started omitting this ingredient as like to eat my granola with berries. I purchase the frozen variety at Costco & thaw as I need them.

Transfer to storage container. My container of choice is a one gallon glass jar I obtained from my days working in the restaurant business. I have stored a batch this size well over a month and have not noticed a decline in freshness, so in my opinion, it stores well.


The recipe as written has approximately 150 calories for each 1/3 cup serving. For this particular batch, I added an extra 1/2 cup each of sliced almonds and pepitas because I had them on hand and wanted to utilize them. In the past I've added raw whole almonds, cashews and pecans. Feel free to add your nut of choice with the understanding the calorie count will change.

Sunday, February 5, 2012

Nutella topped Pumpkin-Chocolate Brownie Bites

Fellow blogger Cafe Fernando and My Baking Addiction announced that today was World Nutella day. Go figure, could it be that I was in sync with "something"...nah!!

So yes, I made these for the Superbowl Party today, but I'm not going to yammer on (like I normally do) or post lots of pictures...I still need to get the chorizo queso made!!


For all you low-landers, head on over to Yum Sugar for the recipe. I omitted topping them with walnuts and chocolate chips. I went straight for the jar of Nutella (slightly warmed in the microwave)and frosted the brownie bites with Nutella goodness once they were cooled. I chose this easy approach, but if you've got the time, I suggest you head on over to My Kitchen Addiction and use the nutella ganache recipe. The ganache will set up nicely and not be as finger-licking messy as I presume these to be!

Mountain town folks at 5,500 ft should use these high altitude adjustments:

add 2 tbsp flour
add an additional egg
decrease sugar by 2 tbsp

Enjoy the Superbowl...go blue & red!! ;-)

DIY Mexican Chorizo

It's Superbowl Sunday and I planned to make a cheesy-chorizo queso dip, only to find that our little grocery store was o-u-t of chorizo. "FINE", I said...I'll make my own!!

When you have all the ingredients, making fresh chorizo is not that daunting of a task.  I know this, because I developed a recipe for the Fishtail General Store while working there for winter employment between seasonal summer work cooking at the 4K ranch.  Ha, daunting you say...do you think I could find that recipe? "FINE", I said...I'll make my own recipe!

I know, in my heart of hearts, the end result is different than my previous work creating this recipe, but that's OK, because it's still tasty.  Use the best quality ingredients you can find. I normally use ground pork from Silvertip Pork Producers, but again, the grocery store was out.


Mexican Chorizo

makes 1 pound

1 lb ground pork
2 cloves garlic
1 1/2-2 tsp kosher salt
1 dried cayenne chili pepper
1 tbsp ground cayenne pepper
1 tbsp ground chili powder
1 tbsp ground Hungarian hot paprika
1 tbsp ground paprika
1 tbsp leaf oregano
1 tbsp ground cumin
1/2 tsp ground black pepper
1/8 tsp ground cloves
1 tsp organic pure cane sugar
2 tbsp cider vinegar
1 1/2 tbsp water

pair latex gloves for mixing

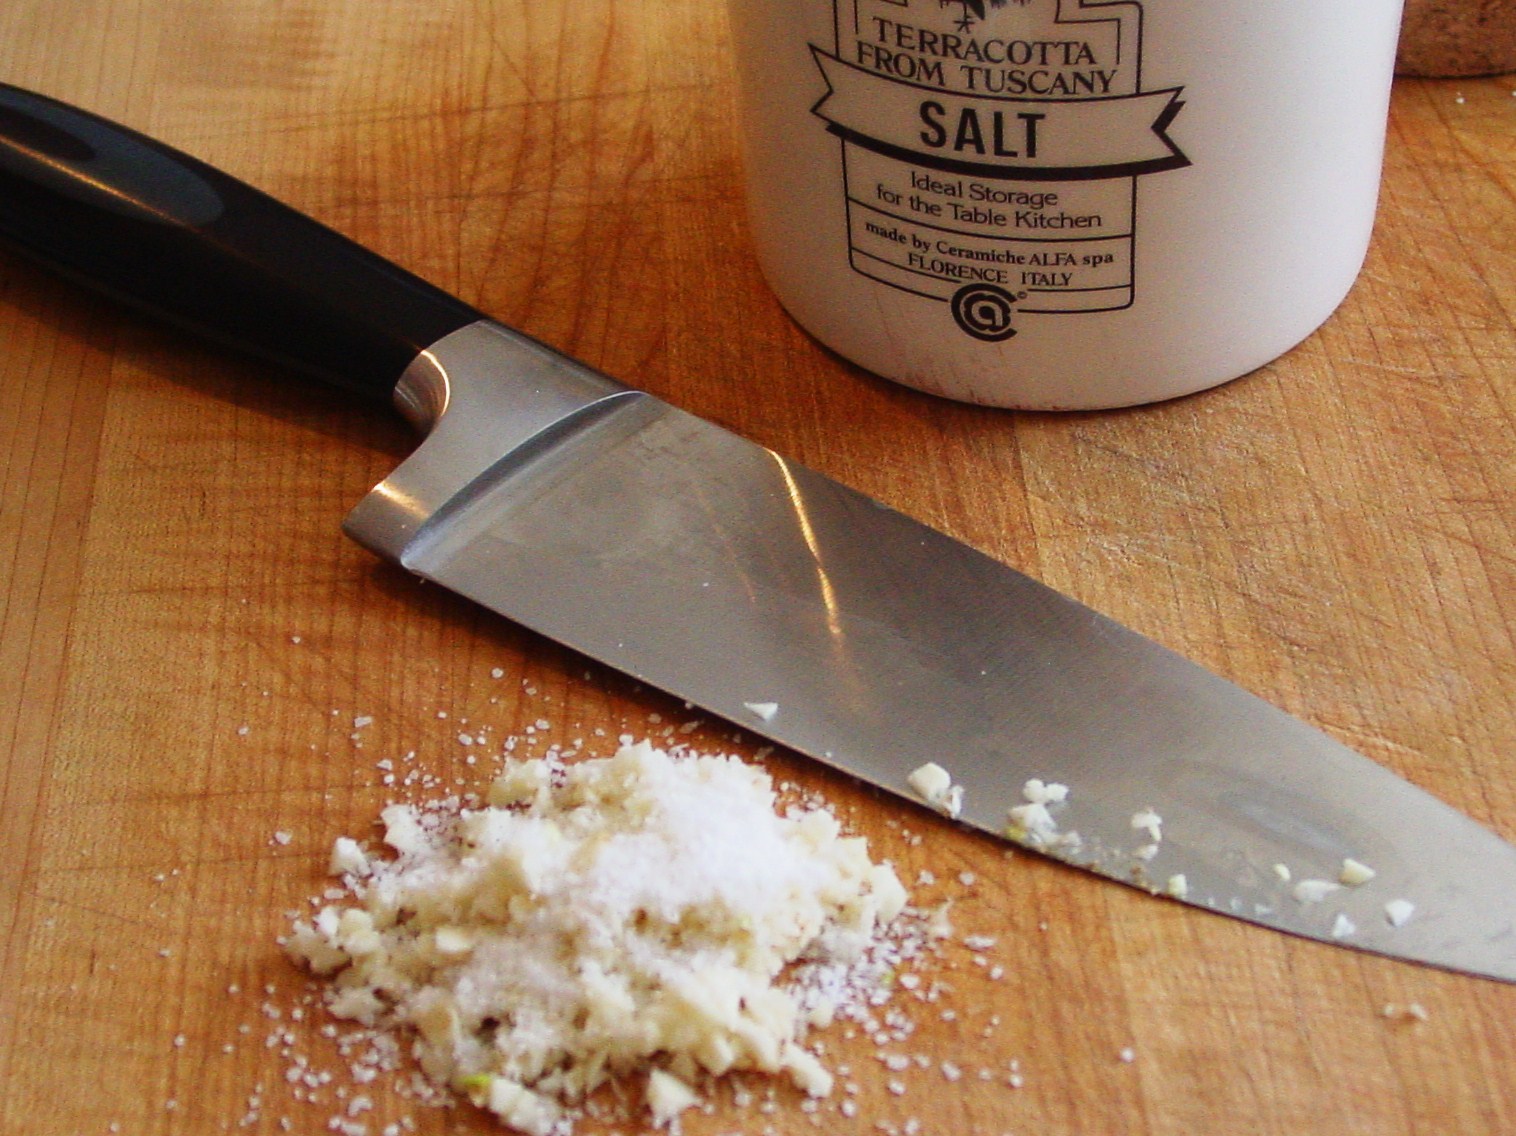
Mince garlic to this stage.


Sprinkle kosher salt over top of garlic...like this..


Then, using the back of a chef knife, create a paste by working kosher salt into garlic. The garlic paste should look something like this...


Next, place the dried chili pepper into a coffee grinder that is dedicated for grinding spices. I used chiles that I had harvested from Wholesome Foods Organic Ranch& Produce last fall. Grind until the pepper resembles crushed red chili flakes similar to what is used to sprinkle on pizza.


Add ground pork, garlic paste, crushed red chili and remaining ingredients into a medium mixing bowl.

 
Using gloves, mix until well incorporated. I didn't have the option this time, but the chorizo is best if it is allowed to rest 24 hours in the refrigerator.


At this point, use the chorizo in your favorite recipe, or package contents and freeze for use at a later time.


Saturday, January 21, 2012

High Altitude Chocolate Chip Cookies

I've always been a Toll House cookie gal, that is, until living in a small mountain town with an elevation of 5,500ft above sea level.  The tried and true recipe on the back of the chocolate chip package does not work here. I expect chewy cookies, crisp on the outer edges and soft in the center.  I think I have "finally" found "the" recipe...stumbled upon this recipe online and it delivers!!

I've shared the recipe below with my usual modifications...use organic ingredients wherever I can along with Montana produced "non-gmo" wheat flour....oh, and I added chopped walnuts and made a larger cookie than what was called for in the recipe online. Upon typing this post, I realize my "golf ball" sized dough balls are somewhat larger than an actual golf ball. So to that I say, make whatever size you'd like...smaller balls yield more cookies & less baking time...enjoy!


FYI...from a modification standpoint compared to the Toll House recipe, this high altitude recipe uses an additional 1/4 cup each of white sugar, brown sugar and flour along with an extra egg.

High Altitude Chocolate Chip Cookies

makes 3 dozen large cookies

1 c organic salted butter
1 c organic cane sugar
1 c organic brown sugar
3 large farm fresh eggs
1 tsp vanilla extract
1/2 tsp salt
1 tsp baking soda
3 1/2 c Wheat Montana all-purpose flour
2 c semi-sweet chocolate chips (12oz bag)
1 c chopped walnuts (not an option for me, but you can leave them out!)

Preheat oven to 350 degrees.  In a large bowl, mix butter and both sugars until smooth.  Mix in eggs one at a time. Stir in vanilla.  In a separate bowl, mix salt, baking soda and flour.  Add dry ingredients to wet and mix just until blended.  Stir in chocolate chips and nuts.  Shape dough into golf-ball sized rounds. Place 2" apart on a parchment lined baking sheet.


Flatten ball slightly using palm of hand.


Bake 12-15 minutes, rotating half way through baking time. Remove cookies from baking sheet and place on a cooling rack.

I didn't want to bake the entire batch at one time, so I rolled the dough into balls, and placed them on a parchment lined baking sheet, followed by putting them in the freezer overnight.


The next morning, I put the frozen dough balls into a zip-lock bag and returned them to the freezer for future use.


Remove frozen cookie dough balls from freezer and place on parchment lined baking pan. Allow to come to room temperature before baking....follow recipe for baking temperature and time.

Saturday, January 7, 2012

Cranberry Orange Muffins

Holy frijoles!! Has it really been over a month since my last post? I have it in my head that I would like to post weekly...perhaps I need to master monthly posts first? Ahem!!

Last night I knew I wanted to make some type of muffin this morning to go along with my latte, so I assessed my refrigerator fruit bin and decided upon cranberry muffins.  I had a bag leftover from Christmas....I planned on stringing them to place on my tree, but that endeavor was quickly aborted as the season went into full swing.


I have a great little muffin cookbook and have used it to make these, but I was sitting with my notebook in my lap and started cruising the web.  I looked at several, but settled on a recipe from a fellow blogger...Caroline over at Whipped. She lives in Chicago which has an elevation just under 600ft. Elevation is something I take into consideration when researching recipes to use while living in our little mountain town with an elevation of 5,500ft.

My basic modifications for high altitude baking consist of reducing the leavening agent by 1/4 tsp, adding 1/8-1/4 cup flour and increasing oven temperature 25 degrees.  However, I remembered reading about high altitude baking adjustments in a new book "Santa" blessed me with.  This book is nothing but brilliant.  The information in this book seems to go on infinitely...definitions for just about any food item you could imagine, along with an expanded glossary section that covers major protiens, grains, cheeses, spices, wines, etc...and the list goes on.  Needless to say, I highly recommend heading on over to Amazon right now...just buy it...you'll be happy you did. I have included high altitude modifications I made for this recipe near the end of the post.


Cranberry Orange Muffins

makes 12 muffins

2 cups whole wheat pastry flour (I used Wheat Montana brand)
2 tsp baking powder
1/2 tsp baking soda
1/2 tsp kosher salt
1/2 cup organic butter, melted & cooled
2/3 cup plus organic cane sugar (plus 1 tbsp reserved for muffin tops)
2 large eggs
1 tsp pure vanilla extract
1 orange, zested* & juiced (reserve juice--use for high alt. adjustments)
1 cup buttermilk (our store does not carry organic)
1 1/2 cups fresh cranberries, rough chopped


Preheat oven to 375 degrees. Grease or line muffin tins with disposable paper liners.

Add first four ingredients in a large mixing bowl. Whisk to combine.

Whisk remaining ingredients, minus reserved tbsp sugar and chopped cranberries, in a medium mixing bowl.

Using wooden spoon, or spatula, add wet ingredients to dry ingredients; mixing just until combined. Fold in cranberries.

Fill muffin cups almost full. Sprinkle tops of muffins with remaining 1 tbsp sugar. Bake 20-25 minutes or until done when tested with a toothpick in the center.

*When using a microplane to zest your citrus...use as shown in the picture below. The underside of the microplane acts as a repository and you'll easily be able to visualize the quantity.


High Altitude Adjustments:
  • baking powder-reduce by 1/4 tsp
  • sugar-reduce by 2 tbsp
  • liquid-add 1/4 cup fresh squeezed orange juice
  • oven temperature-increase 25 degrees
  • decrease baking time approx 5 minutes